Orange Bird Feeders

Today I am finishing up the bird feeders/decorations for our Christmas tree, which is now sitting outside in the snow.

I decided to try and make the Natural Bird Feeders from Lady of the Arts.

For this you need:

Peanut butter
oranges
bird food
we also used some oatmeal

Here’s my prep.

DSCF0566

It’s pretty simple.

First slice the oranges in half…

DSCF0567

then you gut them. We found the easiest way to do that was to segment it like a grapefruit and then scoop out the segments.

You end up with orange shells like these.

DSCF0571

Throw the orange guts into a bowl with the peanut butter, oatmeal and bird seed…

DSCF0570

stir that stuff up…

DSCF0573

and stuff the orange bowls!

DSCF0574

I didn’t bother to string these so I could hang them because we planned on just setting them right on the branches of the tree.

DSCF0577

We ended up doing the same thing with most of the cookies since they never did solidify enough to support their own weight while hanging.

DSCF0565

At least the cheerio ornaments hung properly!

DSCF0578

You ended up not being able to see most of the “decorations due to us having to lay them in there rather than hang them but here is the finished tree..

DSCF0576

Ta Da?

Hopefully the birds enjoy it.

Advent Box

This is something we started last year. Hubby and I noticed that all the small gifts we carefully chose and wrapped for the kid’s stocking were, not ignored really, more like overshadowed, by the bigger gifts on Christmas morning. Who could blame them really? A bookmark or some lip balm really can’t stand up to the latest video game or that sweater you really wanted. The Advent box was an attempt to remedy that.

We decided that we wanted to have a gift opened everyday in December but to give everyone a gift every day was going to be expensive. Luckily our family of five divides nicely into the days before Christmas (with one day where hubby and I both open one) so we decided we would get five gifts for each person and alternate opening them. I like this because 1. it lasts all month, 2. it lends a bit of anticipation to things and 3. it lets everyone have the spotlight (and not have it).

Here is the nitty gritty:

1. Gift prices range from $1-$5 with most being $2 and under,

2. In order to differentiate one person’s gifts from another we each have a different wrapping paper.

3. No food (candy and treats are for stockings)

These are just our family’s rules, you certainly can make your own or forgo them altogether! I think guidelines are helpful though so you don’t get one person receiving $10 gifts and others $1.

Now I had to come up with the Advent box itself.

Basically I started by wrapping an open box in wrapping paper. I chose a red paper with tiny white polka dots.

DSCF0298
This is last year’s box so it’s a little worse for wear but you get the idea. The unwrapped inside doesn’t matter as you will see soon.

Next you take some of that fake snow “fabric” that is typically used under trees…

DSCF0300

and place it into the box so it lines the inside.

DSCF0303

There will be some hanging over the sides and that’s OK.

DSCF0302

I have to fold my piece of snow fabric in half to make it fit right but you may not have too. It all depends on how big your box is.

I don’t attach the snow at all, but you certainly can if you like. If you want to do that I suggest waiting until after you put the gifts in because they will pull the fabric down a bit.

Next you wrap your gifts…

DSCF0305

and stick those puppies in the box!

DSCF0307

I like to use paper with all different colors, but you could easily use a color scheme if you like.

DSCF0310

and I love these little bows! I got them at Walmart for about $1 for a tube of five.

DSCF0309

We have a lot of fun with this! It really makes you think when you have a small budget. Sometimes the gifts lean toward white elephant while other times you really score (like with the black Friday $1.97 DVDs this year).

One of my son’s favorite gifts last year was a set of Angry Birds lip balm. Some other ideas are hand lotion, glade candles, holiday socks, lip gloss, small bottles of booze (for me and hubby), bookmarks, fancy hair elastics (we are a family of cheerleaders after all), dollar tree mugs, colored or holiday pencils and small tools.

Whatever you choose, every gift gets appreciated, and that’s the whole idea!

Beachy Christmas Ornament

Here I go again with the beachy versions of winter stuff.

I finally found some clear, fillable ornaments and was so excited (yeah I know) to try my hand at making one of the many (many, many) versions on Pinterest!

Problems appeared. I had no Holiday themed sprinkles for this one…

sprinkle2

or floor polish for this one…

DIY-Glitter-Christmas-Ornaments

or fake snow with little trees for this one…

treeorn2

What I did have was some left over beach sand and shells from my badly executed Summer Sand Globe. I also had a few smaller shells I had purchased while in Bar Harbor this summer.

Game on.

DSCF0276
All ready…

DSCF0280
l
ittle non-native shells

DSCF0283
l
arger native stuff

First you put some sand into the ornament…

DSCF0279

not too much or it gets really heavy!

Then you add some beachy stuff like shells, dried seaweed and such.

DSCF0290

and trimmed it out with some ribbon!

DSCF0288
(
please ignore the ramen in the background)

I like how this came out. It’s much nicer than the sand globe and will be the perfect gift for a certain land locked friend of mine 🙂

I do wish it was a little more colorful but without the addition of sea glass, which is very hard to find, there is no real way to add color and still be authentic.

Oh well, I will stick with realism!

My beachy Christmas ornament? Well…

DSCF0292

it’s authentic!!

Glitter Dino

OK…truth is I saw so many people make these Glitter Dinosaurs for the Pintester Movement that I kind of felt left out.

DSC07936a

Then the boy decided to clean his room and discovered a whole tub of plastic dinosaurs he didn’t want. It was fate, I snitched me one and got to glittering!

DSCF0032

First the dark parts…

DSCF0033

then the lighter bits…

DSCF0036DSCF0035

Then I gave her a beautiful Christmas manicure!

DSCF0039

Of course I forgot to screw the dinosaur before I started this makeover but I’m sure I can screw her later.

I feel like one of the cool kids now.

DSCF0040

Paperbag Gingerbread Man

I am on a mission. A Christmas craft mission.

The first craft I decided to try was the Gingerbread Ornament from Patternpage.com

Sierra Exif JPEG

I assembled all my supplies and got to work!

DSCF9981

We have paper bags, pencils, sharpies, a cookie cutter (more on that in a bit)  and leftover spider’s web for stuffing. Also the glue gun that didn’t make the picture.

Of course nothing goes smoothly here. The pattern was too big for the little lunch sized bags I have so I had to trace a cookie cutter.

DSCF9982

Next I cut out the gingerbread men and put hot glue around the edges of the two pieces of paper and stuck them together. Then I stuffed the gingerbread man with webbing and sealed up the edges. I didn’t get any pictures of that because, quite frankly, I was too busy burning my fingers and getting webbing stuck in the glue but here is a picture of it all done:

DSCF9985

It was not easy stuffing that sucker and I did not get the glue near enough to the edges so his arms and legs don’t have enough stuffing. If you look closely you can see that we had a little stuffing hemorrhage on the left side of his neck. Also he is very plain.

The example gingerbread man is nicely decorated with ribbon and buttons. I did not have any of that.

I did have some fake holly though…

DSCF9987

although it ended up looking like a Christmas themed clown bow tie. For some reason we decided he needed eyes but turns out they just make him look afraid. I tried to attach some wire to hang him with but, although it worked it does NOT  look good 😦

DSCF9989

So. I ended up with a frightened Christmas clown with flaccid arms and legs whose insides are leaking out and also burned fingers (mine not Holly boy’s).

Fa la la la fail.

At least I didn’t have to buy anything.

Pose-able Mummy

I got this idea from Family Chic

IMG_7428

an adorable little mummy you can pose!

For this you need:
Flexible wire
Muslin
Wire Clips

I wanted to make this an upcycle project so I asked hubby if he had any wire I could use.

He gave me this:

DSCF9821

Wire cutting pliers and some more of that copper wire we used in the ill fated wine bottle bird feeder.

Works for me!

I bent that sucker into  a vaguely human shaped shape.

DSCF9822

I wanted to make his arms longer but I had just enough to make it as is.

Now for the “wrapping”. I didn’t have any muslin but I did have some rolled gauze left over from when my dad had surgery.

But not much. So I had the idea to bulk up my mummy form before putting the gauze on by wrapping it in duck tape first.

I planned to use white tape but found out it had been used up by my husband when he installed the AC units this spring (what? Can’t you use the regular silver kind for that?).

All I had left was zebra tape.

DSCF9823

Good news is…mummy look FABULOUS!

Once you got all the gauze on (all 2 rolls) he looked more mummy-like.

DSCF9824

and he certainly is pose-able!

Although when I tried to sit him like the mummy in the picture, I ended up with this:

DSCF9827

so apparently my wire was not as flexible as it could have been. Also, his arms are too short.

All in all I was happy with him. He is super cute and is pose-able, if a little stiff. It was pretty easy too, and not expensive, even if I had to buy wire and gauze (or muslin).

I do suggest you invest in the right wire if you are going to make this, and make sure your mummy’s limbs are plenty long. Also, skipping the duct tape step (or not adding it) would be a good idea.

My take on tiny. moveable mummies?

DSCF9829

FABULOUS baby!

DIY Shrinky Dinks

I found the idea for these DIY Shrinky Dinks on Curbly.

shrinkydink_large-1_large_large_jpg

Basically, you draw on some #6 plastic with sharpies and then cook it in the oven for a bit and they shrink like shrinky dinks. Pretty cool! I loved those things when I was a kid.

This was pretty easy too since I had some #6 plastic just hanging around.

DSCF9755

The rectangular one looks cloudy because it got dirty and I scratched the living heck out of it trying to get the salad dressing off it. didn’t work either. I finally had to use windex.  The pin said clean plastic, I made it clean.

The next step is to cut off the sides so that you have a flat piece of plastic…

DSCF9757DSCF9758

The circular piece reminded me of candy corn so I separated the wedge shaped bits and colored them…

DSCF9764

What was left looked kind of like a snowflake to me so I colored it with a silver sharpie. At this point I started thinking snow so I drew a snowman shape on the flat piece, punched a hole in it for a hanger and placed them all on a foil lined cookie sheet. My hope was that I would get a Christmas ornament out of this but really, I just wanted to see if it would work.

The directions said to put foil directly on the rack to hold the pieces but I knew that would end badly for my clumsy self so I went with the cookie sheet for easier removal.

Here are all my pieces before…

DSCF9766

and after.

DSCF9767

It worked! Of course some worked better than others. I like how the snowman came out and some of the candy corn came out well too, but others were a bit curly.

DSCF9769

And that “snowflake”?

DSCF9771

It ended up looking more like a squashed bug.

According to the instructions you should be able to flatten out the curly ones if you act fast enough, but I guess I wasn’t fast enough.

Anyway…I did like how most of these turned out and I think that I will try them again soon. I’m calling it a win even though some of them were seriously messed up. I think i will try tracing some pictures instead of freehanding it since an artist I ‘aint.

My daughter says she would like to make some too so it looks like another trip to the salad bar is in order!

UPDATE!

I made another ornament this morning. At the request of my daughter I made a stained glass type ornament using an image from Daily Coloring Pages.

After tracing, coloring and cutting it out, into the oven it went…

DSCF9777


You can’t really tell from the photo but that’s about 3″ in diameter.

Here it is when it was done it looked like this:

DSCF9779DSCF9781


I really like how it came out but will start with a larger image next time. Also, I forgot to punch a hole to hang this “duh”.

Halloween Lantern Jars

Time for another Halloween craft!

This time I picked these Halloween Decoupage jars from Taste of Home.

lantern_300

Cute, no?

I dug out my Mod Podge, found a jar and picked up some Halloween themed tissue paper.

DSCF9730

Then I cut the tissue paper of choice into strips…

DSCF9731

slathered that jar up with Mod Podge…

DSCF9733

and stuck the paper on there.

DSCF9734

As you can see, there wasn’t good stickage where the strips of tissue paper overlapped.  I tried to fix that with my top coat of Mod Podge,

DSCF9735

After coating that jar I realized it might be too dark to be an effective lantern. Plus I wanted to try and make one with a face so I went in search of another jar and found this little guy.

DSCF9736

and covered it with the orange-ish tissue.

DSCF9737

Next I printed off some faces from the Taste of Home website, cut them out and Mod Podged them on.

DSCF9738

Isn’t it cute?

I left them to dry overnight and this was the finished product!

DSCF9744DSCF9745

This was a pretty easy project except for the part where you smooth out the tissue paper. That part didn’t go so well. I also ended up covered in Mod Podge but that could have been me. My fine motor skills are not the best if truth be told. The top edges were difficult for me too. I had to apply more Mod Podge in the morning to neaten them up.

DSCF9741

As you can see the candy corn jar is not too dark for the light to shine through, although the jar got very hot after just a few minutes so I’m not sure that using it for a candle holder is such a great idea. The Jack-o-Lantern was fine, but then I was just burning a birthday candle in it. I think I will try a tea light in that one later and just plan on putting candy in the other one! I also didn’t like how obvious the parts where the tissue paper overlapped were.

Frankly I thought they came out OK…it worked but not something I’d display for company or give as gifts or anything. If I were to try again (and I just might) I would be more careful when overlapping and with the top edge.

Cute?

DSCF9740

Not so much. Also messy and a possible fire hazard.

Paper Bag Halloween Tree

The other day I got the urge to craft. With Halloween coming I had so many cool ideas to chose from! However, once again money got in the way. Our family is one that has been affected by the shutdown and although we are OK for now I just couldn’t justify spending money on crafting materials. Time to take a look around!

What did I find? Some pipe cleaners, the odd foam sheet, sharpies up the wazoo and…a plethora of those little brown paper lunch bags. I had bought a bunch last year for a bake sale and nobody wanted their stuff in a bag so I have a crapload left over. My kids are way past the paper bag puppet stage so those piles of bags sat in a drawer unused.

I went to Pinterst and searched “paper bag crafts” and found this:

cef0b195b4e8e3e83f4a961549dfaff4

Paper Bag Trees from spoonful.com

The first issue with this project is they use full sized paper shopping bags.  I figured that I could just make a smaller tree but because the lunch bags are thinner, I also doubled them up.

Here is them laid out flat and cut:

DSCF9699

The directions say to wrap the bag around a water bottle but since my bag was small I used this instead.

DSCF9700

All wrapped up!

DSCF9701

Here it is after the initial twist…

DSCF9704

After this you are supposed to twist the cut bits together to make the main branches and then cut the untwisted parts into smaller strips and twist for the smaller branches. I found that after twisting the larger strips I ended up with already separated strips, possibly because I doubled up the bags, At any rate I didn’t end up cutting anything and I got smaller branches.

After twisting the big branches…

DSCF9705

and the 2nd.

DSCF9709

I wanted a little something extra for my tree so I made this raven. I just drew one on the cut out bottom of the bag and stuck him on there.

DSCF9711

Let me say this…tose branches are harder to twist then you think they are going to be and they tend to un-twist themselves when you aren’t looking. I wish there was some way to glue them once they look like you want them too. It was pretty easy besides that though and I think it looks pretty good.

Paper Bag Halloween Tree…

DSCF9717

SCARY.

Flashback Frid….er Sunday? Chicken Mummies!

This is more of an activity then a craft, but since there is crafty involved I think it totally counts. This project is from awhile back when we studied ancient Egypt.

I have never mentioned it here but we are a homeschooling family. One of the great things about homeschooling is that we can do awesome, fun projects.

One of those projects is making these chicken mummies!

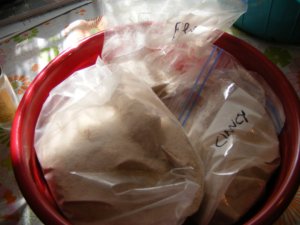
First you need some supplies:

27097_382976991621_4002269_n

salt
cinnamon
baking soda
baking powder
alcohol
oil (any type-not pictured)
large ziplock bags
small frying chickens or Cornish hens

If your poultry of choice is frozen, thaw it out.

27097_382977016621_7081793_n

Mix up the ingredients for the natron salt…

27097_382978991621_2267351_n

this was the kids favorite part!

The natron is where you use all that salt, baking soda, baking powder and some of the cinnamon. I looked all over for the directions we originally used and couldn’t find them but I seem to remember a ratio of 1/2 salt, 1/4 BS and 1/4 BP and then add a bunch of spices. I have seen directions using all salt so I think as long you have plenty of that you will be all set. You will need to make a LOT of natron so if you can get the ingredients in bulk, do so. Otherwise you will have to go to Walmart and buy all that stuff you see in my picture…more than once…and the cashiers will begin to wonder about you.

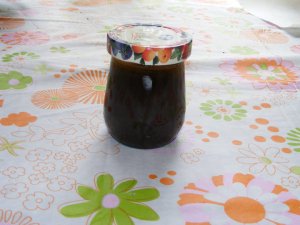
You will also need some spiced oil. This is basically oil and spices (shocking!) that you need to mix up early on as the spices need to steep in a jar. Neither the natron nor the oil recipes specify cinnamon, you can use any aromatic spice (cinnamon. cloves, nutmeg, allspice), but since I had to use a butt-ton I went with the 2/$1 cinnamon.

Here is our spiced oil percolating in an old jam jar.

27097_382977026621_3001571_n

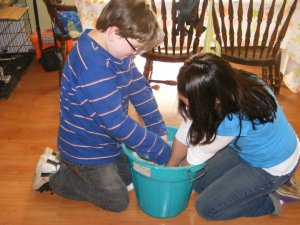
Now you need to get the chickens ready. We used Cornish hens. You need to wash the hens, dry them and dip them in an alcohol bath.

27097_382979041621_707762_n

Then fill the cavity with natron and nestle them in more natron.

27097_382980521621_1744522_n

27097_382980536621_6269956_n29508_388431086621_6460826_n

At first we used the ziplock bags but found it was hard to keep the whole hen covered so we switched to a large Tupperware container.

You need to change the natron a lot at first, like every few days, but after awhile you can go every week or so. You will need to remove the hens, clean off the salts (I read you were suppose to wash them off but I just brushed them off) and add new salts.

After a week or so they looked like this:

29508_388431071621_7587472_n

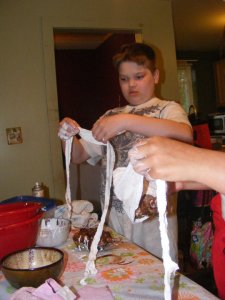
After about six weeks the hens were ready for their entombment! This is the fun part!

You need to anoint the mummies in spiced oil then wrap them in cotton dipped in glue. I had a bunch of rolled bandages and some mod podge,,,good enough!

29858_398337071621_5977087_n

Here are the results: Queen Cluckopatra and King Bobantatum!

29858_398337726621_4212916_n29858_398337706621_3346648_n

They were then gilded…
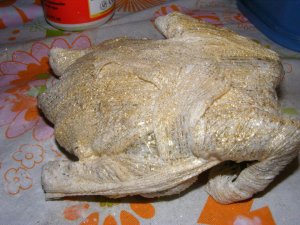
29858_398338991621_6352729_n29858_398338421621_180407_n

and entombed.

29858_398338981621_2751679_n29858_398343721621_6372739_n

We also preserved some of the internal organs and sored them in canopic jars. You don’t wrap the organs, you fill the jars with oil.

29858_398340561621_1702453_n

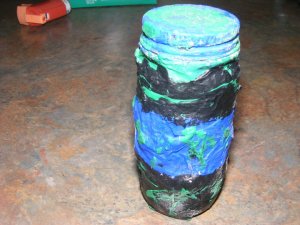
The tombs are wipe containers spray painted and then hand painted with acrylics and bejeweled. For the canopic jars were just paper mache and acrylics over ordinary jars (I think this jar was a caper jar). The gilting was spray glitter.

It was fun but it left quite a mess.

29858_398342891621_2225100_n

We made these about 3 1/2 years ago and they still don’t smell. The organs however did. We didn’t keep those.