Roast Chicken and Potatoes

Recipe time!!


I got this from Joyously Domestic

1-RstdChickenPotatoes


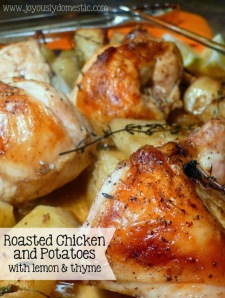
Doesn’t that look delicious! I certainly thought so.

The recipe calls for chicken parts, potatoes, onion, lemons, white wine/chicken stock, fresh thyme, olive oil and balsamic vinegar. Remarkably I had all of those things except the chicken parts. You could argue that was the most important part but since I needed to do my bi-monthly shopping anyway I added “cut up whole chicken” to the list and added this to my meal plan.

Turns out there were no cut up whole chickens (they always have them except NOW when I NEED one but whatever) so I bought a package of breasts, one of thighs and one of drumsticks…all with bones and skin. Good enough.

Once I started cooking I quickly discovered I would need more potatoes so I upped the amount of those plus the onion and lemon. I ended up with about two pounds of potatoes, 2 onions and two lemons.

I did a few other things differently as well. I mixed up the potatoes, onions, lemons, olive oil and salt and pepper and put them in a 9X13 baking dish. Then I laid the chicken pieces over that and added mire salt and pepper, drizzled the balsamic vinegar over the chicken, sprinkled the (dried ‘cuz that’s all I had) thyme over that and then added the chicken stock. I did it that way because my son cannot have any added fat in his food. He had rice instead of potatoes.

At this point I removed the chicken, added the garlic and then put the chicken back on. Because that’s what you do when you forget to add the garlic when you are supposed to.

After an hour at 425 (covered for 20 minutes of that) it looked like this:

DSCF1611

Pretty close, no? It tasted great too. The lemon really adds a freshness to the dish and the chicken is amazing! The kids liked it too.

The only bad part I found was there was a lot of liquid in the pan. I’m thinking maybe less time covered would solve that? We just used a slotted spoon to get the potatoes out and it was fine.  My potatoes weren’t as browned as the original either and more time uncovered might solve that issue too.

All in all it was a keeper!

Paint Chip Crafting

Today I did some errands with the hubby and came home with these.

DSCF1559


And these little beauties!

DSCF1561
(no I didn’t just take paint chips, we are thinking of a little spring spruce up)

Can you see where I’m going with this?

Oh yes…paint chip bookmark time!!

Here’s how I made mine.

First I picked two chips I liked together. one with cutouts, one without, and laid them on top of each other.

DSCF1562


Then I cut out a bookmark sized strip out of the top chip.

DSCF1564

I did the same thing with the background chip and stuck them together with double sided tape.

DSCF1567

You can choose complimentary colors or with similar colors, and finish them off by punching a hole in the top and adding a ribbon.

DSCF1583

I have a short attention span, so after a couple bookmarks I lost interest 😉

After perusing the interwebs, I found this…

How to Make Boxes From Paint Swatches from How About Orange

paint-chip-boxes-stack


The instructions say to cut your chip to a 5″x5″ size. Problem was mine was about 4″x4.5″.

Whomp, whomp.

Oh well. I looked at the instructions again and figured out that I just needed to make the center section 2″ so I made a 4″ squarre and figured the box just wouldn’t be as deep.

After you do that you just need to mark 1″ from each side so you end up with a 2″ square in the middle. I scored the lines, cut notches and attached double sided tape to the tabs.

DSCF1572
DSCF1573
DSCF1574

DSCF1575

After that just stick that sucker together. Do the same for the cover except the inner square should be slightly bigger.

Or not.

DSCF1577

Um…yeah.

Measure carefully people.

Good news is I managed to make one that worked!


DSCF1579


So..three wins and one fail…not bad!


More painted canvases.

It’s actually relatively warm around here (we reached 60F today!), snow is all melted and the ice is off the lake.

Oh yes, spring is here.

I wanted to make something cheerful for my wall and since my hubby bought my some canvases I could do so pretty easily.

I wanted something based of this quote…

“When you look at a field of dandelions you can either see a hundred weeds or a hundred wishes.”

I have no idea who said this, but it really resonated with me.

Lets get down to the crafting.

First I painted a canvas.

DSCF1528

Once that was dry I wrote the quote on in pencil

DSCF1534

I can quickly see the whole quote wasn’t going to fit where I wanted it to. The solution? Shorten it a bit!

Once I got then words situated, I traced them in black sharpie and drew on the dandelion. My handwriting is still a little shaky since I just learned to write with my left hand. It adds to the homemade-ness…yah, let’s go with that!

DSCF1535

I had issues with my dandelion. The stem was too green and the flower part not big enough.

I fixed it by adding more seeds and painted a bit of yellow over the stem.

Ta-da!!!

DSCF1536


The Day I Drowned my Peeps

Our family started a new tradition a few years ago. We go out for Easter dinner.

It was my Mom’s idea really. We used to do a big dinner with extended family but over time it had dwindled to just my crew and My mom and Dad. We always went to her house because mine is very small and she no longer felt it was worth the time and effort to have a big dinner at home so now we go out somewhere that will make the ham for us!

That still leaves dessert though, and that’s my territory. This year I decided to try and make these Chocolate Easter Peeps from Raining Hot Coupons

She put hers on lollipop sticks, but I decided to just sit them on foil to dry so they would be like chocolates rather than pops.

Mizen-en-craft!

DSCF1482

I melted the chips in bowl, set the peeps out on a sheet of foil, got some forks for dipping and got too it!

Time to dip the peeps!

DSCF1484
(sorry about the blur)

attached tails and set them to cool.

DSCF1485


At this point I feel the need to mention how…er…floppy the peeps were when dipped in the melted chocolate. I cant imagine them holding their shape if they weren’t laying flat. Also the extra chocolate did not drip off, we had to scrape it off and even then you can see how much pooled up around the bunnies. I suspect it had something to do with the fact that I used chocolate chips instead of melting discs.  But I wanted good chocolate so I dealt.

As I mentioned, and you can see, they were not the neatest of things. Things didn’t improve much after they cooled either.

DSCF1491DSCF1493

I was able to get most of the extra chocolate chipped off and even if they weren’t pretty, they were delicious!

DSCF1492

And since you only use 6 mini marshmallows I had plenty left to make Rice Krispie treats!

DSCF1498

I’m Baaack!! (and I brought eggs)

Cheering is over for the season and I am over the plague so I can finally get back to crafting!!

I’ve missed it so.

Since Easter is Sunday my triumphant return will be….Easter Eggs!!

We did a few different methods of Easter egg decorating:  nail polish marbling, sprinkles and shaving cream and food coloring.

First we’ll cover shaving cream and food coloring. I got the directions at A Thrifty Mom.

I put a bunch of shaving cream into a plastic container and added food coloring…

DSCF1427


Then I swirled it all around…

DSCF1429

Looking at it, I can see in this picture what my first mistake was…I used a light color and I didn’t use enough of the colors i did use. Didn’t know it at the time though, so I rolled that egg!

DSCF1433

I also didn’t leave the shaving cream on long enough so the colors ended up rather muted.

DSCF1474DSCF1475

My hands smelled great though 🙂 and I really thought they were pretty…just not as vibrant as the original.


Next up-Sprinkled eggs! I saw the directions somewhere that said to coat the eggs with sugar/water paste and put the sprinkles in a bag then add the egg. When I looked it up the only instructions I could find said to use tacky glue and roll the sprinkles on. I decided I would use Elmer’s (as it’s non toxic) but use the bag method.

DSCF1439

I painted that eggy with glue and bagged it up.

DSCF1440

So far so good, right? I covered it and took it out of the bag and this happened…

DSCF1441

Lovely.

Things got worse from there. Even after I let it dry for quite awhile the sprinkles just fell off as soon as I touched it.

Bother.

Silver lining here was that the sprinkles left behind color. So even though my egg ended up naked, it was still pretty!

DSCF1480

Last up…nail polish marbled eggs. The instruction can be found here.

My daughter is the nail polish queen so we definitely had the supplies! I didn’t get very many pictures of the actual crafting part, but here is my prep.

DSCF1426


Basically you take room temperature water, drop some nail polish in it, swirl it around then drop your egg in.

First I tried pink, blue and green. This worked pretty much like they said it would except that the pink polish didn’t swirl, it clumped. I thought I got all of the clumps but…no.

DSCF1442


The other side looks a lot better I think. Especially after I dyed the egg green to cover the empty spaces.

DSCF1477

Next I tried the coral and gold polish. I dyed this egg orange after the polish dried.

This one came out  beautifully I think!

DSCF1476

The instructions said only one side of the egg would be marbled but I got both sides covered (along with my fingers and the egg dipper and the cup).

Well that’s my egg decorating adventures! I hope it was worth the wait and I expect to be posting a lot more now!